

 • PhotoTraces")
I had just one aim in thoughts once I determined to shoot sundown within the native park within the neighborhood of Montreal. I needed to place the X-Trans sensor of my new Fujifilm XT2 digital camera to the check and take it to the restrict. I attempted to estimate the dynamic vary of the sensor, capturing instantly into setting solar.
After years of shooing bracketed exposures for HDR with Canon and Sony cameras, I might see that the brand new Fujifilm X-Trans sensor was extra succesful. I needed to check if it was potential to keep away from HDR all collectively to make my workflow easier.
The Fujifilm XT2 carried out splendidly. I managed to seize the sundown scene capturing instantly into the solar with out clipping highlights or shadows. All I wanted is one shot solely.
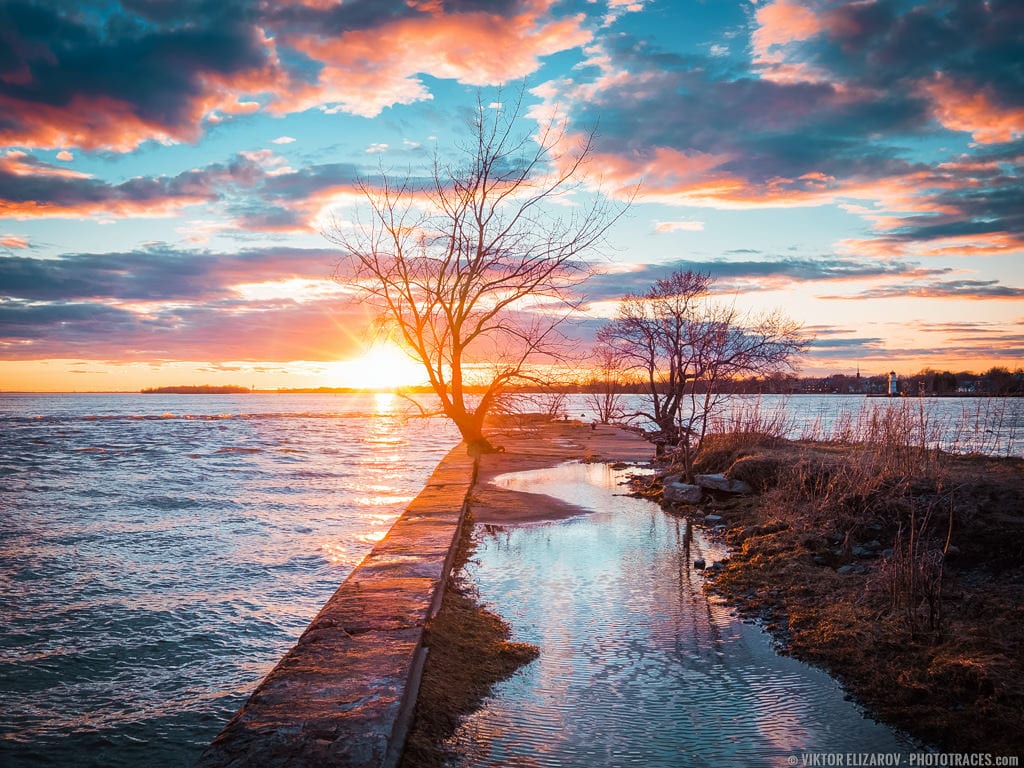
However by the tip of the day, I managed to realize two extra targets I used to be unaware of initially of my shoot.
After the rain, it was very windy, and I might see the potential to realize an thrilling composition by incorporating the reflections of the scene in breezy water. I deliberately didn’t use a tripod, avoiding lengthy exposures. I needed to freeze the movement of the breezy water. Producing an fascinating composition grew to become my second aim.
And at last, once I noticed the cloud formations and its colours, I acknowledged it might be an ideal alternative to take the Vary Masks device in Lightroom to its full lengthen. I used one Vary Masks to highlights the purple areas of the sky and one other Vary Masks to reinforce the blue areas. It was aim #3
Capturing
The capturing itself was uncomplicated. I used to be capturing handheld in a single capturing mode with out bracketing.
The problem was to provide you with an fascinating composition as a result of the house on the outdated pier was minimal, and I couldn’t completely align the solar, two bushes, and the lighthouse within the background. However I did my greatest.
Digicam: Fujifilm X-T2
Lens: Fujinon 10-24mm
Focal Size: 22m (Hyperfocal distance: 3m)
Capturing Mode: Aperture Precedence (A)
ISO: 200
Aperture: F/8
Shutter Velocity: 1/110s
Tripod: handheld
Modifying & Processing
It was a single RAW processing workflow.
Lightroom (80%)
My first aim was to enhance the composition. I used the Crop Overy device to make composition tighter. Subsequent, I modify the unique facet ratio 3 x2 to 4 x 3.
I used the Napa preset from my Journey Professional Equipment Assortment (coming quickly) as the bottom for Lightroom Speedy Modifying. Then I used TOOLKIT to spice up the Publicity and open Shadows.
The Lightroom Preset Modifying Formulation: Napa (1, 8, 23, 32)
I created 2 Graduated Filters, one for the purple highlights of the sky and one other for the blues of the sky. I utilized the Rnage Masks on every Graduated filter to maximise selective focusing on.
You’ll be able to be taught extra about superior use of the Vary Masks in my in depth tutorial right here: Lightroom Vary Masks: Superior Luminosity and Shade Masking in Lightroom
Photoshop (20%)
In Photoshop, I cleaned up the picture by eradicating particles within the foreground with the assistance of the Stamp Device. On the very finish, I diminished the digital noise. I used the Topaz DeNoise plugin.
Complete time: 20min
Earlier than & After Transformation
