


On this article, I’ll share how you can cull pictures in Lightroom quick and in essentially the most environment friendly approach.
Digital images tools isn’t low cost. However there may be virtually no further price to take a further photograph in distinction with movie images. Because of this, practically all of us overshoot, taking extra photographs than essential. It prices us dearly within the time we spend culling and processing.
After I realized that, on common skilled photographers spend between 10% and 14% of their time culling photographs in photograph organizing applications, I used to be shocked. It additionally motivated me to streamline and optimize my culling course of in Lightroom. With the brand new culling strategy, I’ve extra time for exploring and touring and fewer time in entrance of a pc.
What’s Culling in Pictures?
Culling, often known as “trimming,” is the method of eradicating undesirable pictures out of your library and figuring out ones you wish to hold. The aim of culling is to cut back the variety of photographs to essentially the most interesting and technically sound ones with the potential for publishing or delivering to shoppers.
In digital images, you carry out culling utilizing photograph group applications like Lightroom, Bridge, Picture Mechanic, and so on.
How To Cull Pictures In Lightroom Quick
To cull pictures in Lightroom quick and efficient, I repeat the next steps each time:
- Import all new pictures right into a single folder
- Rename all photographs throughout the import
- Reject undesirable pictures by flagging them with the keyboard shortcut “X”
- Use the shortcut “P” to flag the pictures you wish to hold (keepers)
- Use the colour labels to ented the “keepers” to the modifying funnel
- Delete the rejected pictures
Picture Group on Laborious Drive
Earlier than you begin culling your photograph assortment, ensure you have a complete and logical folder construction in your laptop’s onerous drive.
Listed below are some pointers I observe when managing my photograph library:
Use the Quickest Drive for New Pictures
While you handle bigger photograph libraries in Lightroom, its efficiency and responsiveness endure. Make sure that to decide on the quickest onerous drive in your photograph library. Stable-state drives (SSD) are the most suitable choice. I take advantage of Samsung EVO SSD drives.

If the price of SSDs is prohibitive to host big libraries, you may strive utilizing my lifehack. I hold solely current picture collections on my SSD drive, and when I’m accomplished with the culling and processing, I transfer them to my largest spinning onerous drive, the place my complete photograph library resides.
Hold All Your Pictures In One Place
The worst doable situation for organizing your pictures is is to retailer them in other places in your laptop. It makes it troublesome to search out them, and the method of backing up your library turns into a nightmare.
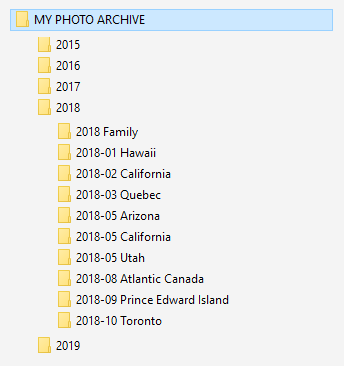
Right here is the construction I take advantage of for my photograph library:
I hold all my pictures contained in the grasp folder MY PHOTO ARCHIVE.
Contained in the grasp folder, I arrange the pictures by yr and by location.
Come Up With A Logical Naming Conference And Stick With It
Yearly I create a brand new folder. For the folder identify, I take advantage of the yr solely.
I take advantage of the naming conference contained in the annual folder primarily based on the yr, month, and site.
Since I’m a journey photographer and my journeys last more than sooner or later, I don’t use particular dates.
However, if you’re an occasion photographer, together with the exact date within the folder identify could be useful.
For all my pictures, I take advantage of a naming conference the place I point out the precise date I took the photograph, location, and the unique file identify generated by the digital camera on the time of the capturing.
I rename my pictures throughout the import course of utilizing the file renaming template (see the following part).
Importing Pictures to Lightroom
You cannot cull or course of your new pictures till you import them to Lightroom.
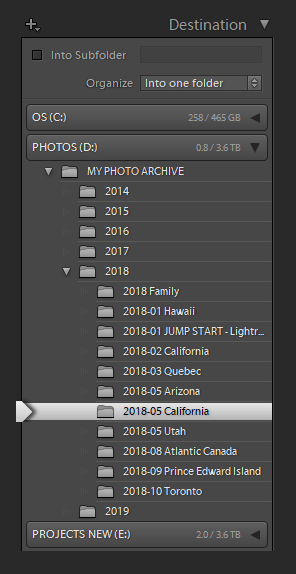
First, I create a brand new folder on a tough drive inside my grasp library beneath the corresponding yr.
Subsequent, I launch Lightroom and activate the Import module.
I specify the place I wish to import all my new pictures, pointing to the newly created folder.

I additionally use the Title Renaming Template to rename all my RAW recordsdata throughout the import.
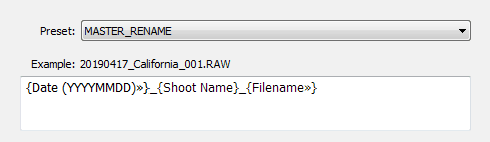
After renaming, all my pictures have the next naming construction:
20190417_California_DSF0211.RAW
20190417_California_DSF0211.RAW
For extra info, please test my devoted tutorial right here.
For the reason that import course of is sluggish and it might take hours to import a lot of pictures, I often begin the method earlier than going to mattress. After I get up the next morning, all my photographs are imported, the previews are generated, and I’m prepared to start out the culling course of.
Rejecting Unwaten Pictures
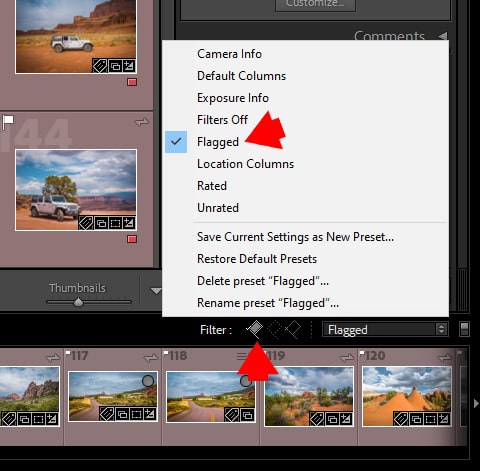
Within the Lightroom Library module, I activate the Loop View by hitting the E shortcut or by clicking on the Loop View icon on the backside left nook.
To mark a photograph as REJECTED, use the shortcut X. The rejected photograph will likely be greyed out, and the reject flag will likely be added.

By default, after rejecting any given photograph, you want to use the arrow key to advance to the following picture until you activate the ADVANCE mannequin.
You activate the AUTO ADVANCE mode by hitting the shortcut CAPS LOCK, which tells Lightroom to advance to the following photograph after flagging any given picture.
I all the time use the AUTO ADVANCE mode; it’s a big time saver.
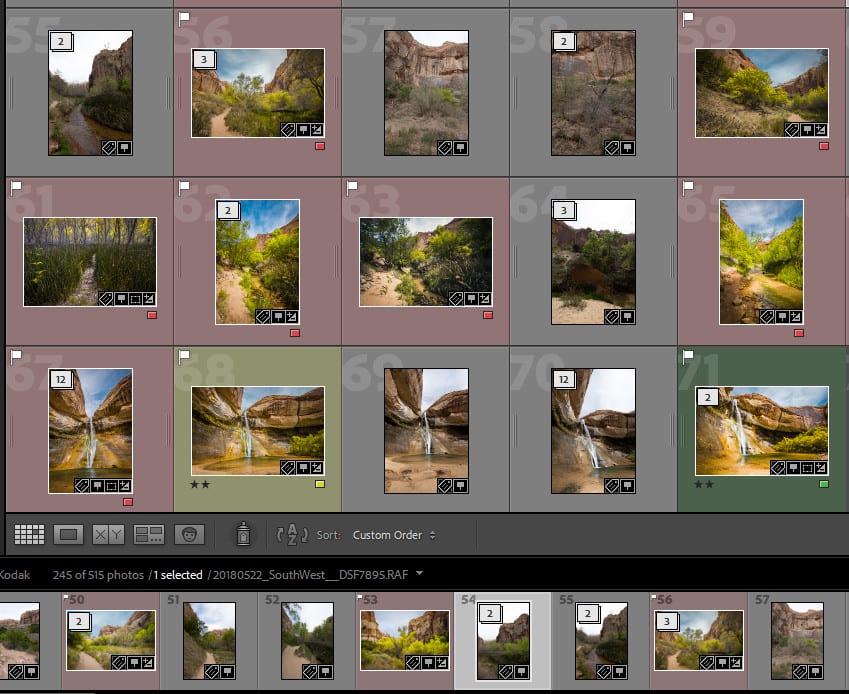
When flagging the pictures as rejected, I all the time search for apparent flows akin to out-of-focus pictures, unintentional pictures, pictures with mistaken publicity (blown highlights, clipping shadows). In case you cull pictures with folks, the obvious flows is usually a mannequin with closed eyes or in a clumsy pose.
I am going via a whole assortment of recent pictures in a matter of minutes, concentrating solely on one activity, flagging undesirable pictures as rejected.
Flagging Keepers
Figuring out the keepers is my favourite step of the culling course of.
I take advantage of a routine much like the earlier step. However as a substitute of rejecting pictures, I flag essentially the most thrilling photographs because the keepers. I plan to course of and publish them sooner or later and hopefully embrace the perfect ones in my portfolio.
I press shortcut E to enter the Loop View of the Library Module.
I additionally hit the CAPS LOCK key to activate the AUTO ADVANCE mode.
Subsequent, I am going via the whole folder of pictures one after the other, attempting to identify the pictures I wish to hold.
I take advantage of the shortcut F to flag the chosen photograph as a keeper. The Lightroom provides the flag icon to them.

The method of flagging the keepers takes longer in comparison with rejecting undesirable pictures. It’s a very subjective course of, and generally it takes a judgment name to flag or to not flag a selected photograph.
By the top of this step, I’ve three sorts of photographs: flagged (keepers), rejected, and pictures with none flags.
What Occurs to Photographs With out Flags?
I hold them. Pictures with out flags should not going to my processing funnel, however I don’t delete them.
I’ve a routine to undergo my unflagged pictures annually or so with the hope of discovering initially missed jewels. And I typically uncover photographs with nice potential.
At this level, the culling course of is accomplished. I deleted undesirable photographs, and I recognized pictures able to be processed.
Now I wish to present you ways my culling course of logically transitions to the processing part.
Deleting Rejected Pictures
The ultimate step is to delete rejected pictures and overlook about them.
Use the keyboard shortcut CMD + DELETE (Mac) or CTRL + BACKSPACE (Home windows).
Use the highest menu: Picture > Delete Rejected Information.
Sensible Collections Enhancing Funnel
The following step is to maneuver all my “keepers” (flagged pictures) to my modifying funnel to assist me to trace the progress.
I take advantage of 3 Sensible Collections for my modifying funnel: Candidates, Processing, Revealed.
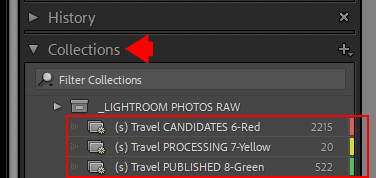
The Sensible Assortment in Lightroom is a dynamic number of pictures generated by Lightroom mechanically primarily based on predefined guidelines you specify.
In my case, I take advantage of Sensible Collections primarily based on the Shade Labels.
For instance, after I add the coloration label RED to any photograph, Lightroom mechanically provides it to the Candidate Sensible Assortment.


Shifting Pictures Via Processing Funnel
After I end the culling course of, I take advantage of the Lightroom filter to show flagged photographs solely. Subsequent, I choose all of them (Ctrl+A).
I press the 6 key to use the RED coloration label to all chosen pictures. Lightroom provides the colour label to the pictures and, on the similar time, triggers the Sensible Assortment rule and provides all labeled pictures to the CANDIDATES sensible assortment.
Now, I’ve “keepers” added to the modifying funnel.
Relying on the challenge I’m engaged on or the tutorial I’m writing, I am going to the CANDIDATES sensible assortment and search for the pictures that assist me illustrate my tutorial and articles.
After I discover a appropriate candidate, I press the 7 keyboard key so as to add a YELLOW coloration label to the chosen photograph. It additionally tells Lightroom to take away the picture from the CANDIDATE sensible assortment and add it to PROCESSING sensible assortment.
The photograph stays within the CANDIDATE assortment till I end processing and am able to export the ultimate model from Lightroom.
That is after I use keyboard key 8 to vary the coloration label from YELLOW to GREEN. It additionally removes the photograph from PROCESSING sensible assortment and strikes it to the PUBLISHED sensible assortment.
The PUBLISHED sensible assortment is the ultimate vacation spot of my modifying funnel.
Exporting Ultimate Pictures Utilizing Export Presets
The ultimate step is to export the processed photograph from Lightroom for publishing or printing.
I take advantage of the Export Presets I developed over time primarily based on my wants, so I don’t waste any time fidgeting with the infinite export choices.
You’ll be able to be taught extra concerning the Export Presets within the devoted article, and be at liberty to obtain the Export Presets I take advantage of.

Tips on how to cull pictures in Lightroom: Conclusion
As you may see, the culling in Lightroom is a multistep course of that you may customise and absorb any path you need.
Articles Associated to “Tips on how to Cull Pictures in Lightroom Quick“
I hope my culling course of will encourage you to develop the culling workflow that matches your model of images and your modifying.