


To know the best way to save preset in Lightroom Cellular, you could see the massive image.
First issues first: if in case you have an enormous preset library, you’ll have to create them in your pc after which sync them throughout units. That means, you’ll be able to maintain your presets organized and saved in a single place and use the important ones on the cellular app.
We’re going to wish Adobe Inventive Cloud. As you may know, Lightroom comes with three apps: Lightroom Traditional, Lightroom Desktop (former Lightroom CC), and Lightroom Cellular.

Let’s see how every app differs in creating and managing presets – however, extra importantly, how they’ll work collectively to ease your workflow.
The right way to Save Preset in Lightroom Cellular
Lightroom Cellular is nice for modifying on the go and sharing your pictures with family and friends. But it surely’s not perfect for growing a preset library, because it’s unattainable to handle them successfully there.
Fortunately, there’s a means round this: you’ll be able to ship your favourite preset collections from Lightroom Traditional to Lightroom Cellular. It’s a bit extra work upfront, however it saves a lot time in the long term!
Steps to save lots of presets in Lightroom Cellular:
Create Presets in Lightroom Traditional
Step one in organizing and managing Lightroom presets is creating some presets!
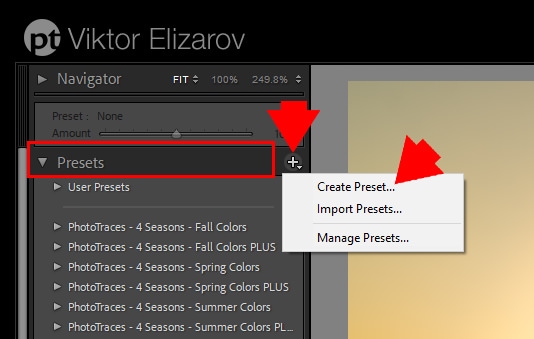
Steps to create a preset in Lightroom Traditional:
- Within the Develop Module, take or choose a photograph in Lightroom and apply all the required changes.
- Within the Preset Panel, save the preset by clicking on the “+” icon subsequent to Presets.
- Within the “New Develop Preset” dialogue field, go to “Preset identify” and provides a reputation to your preset
- Go to “Group” to select a group you wish to put your preset in (or choose “New Group” and create a brand new one)
- Look over all of your changes within the “Settings” part (save all or choose those you wish to maintain)
- Click on “Create”

You may create as many presets or preset collections as you need. Likelihood is, you’ll do that when you get the hold of it.
Organizing and Managing Presets in Lightroom Traditional
In case you have giant presets libraries, you want Lightroom Traditional to prepare them successfully. When you check out totally different modifying kinds, this can most likely be the case.
There are a number of methods in which you’ll manage your presets in Lightroom Traditional; a number of the finest ones embody:
- Disabling Lightroom default presets
- Disabling Assortment(s) you do not want
- Renaming presets
- Transferring presets (from one Assortment/Group to a different)
- Creating new Preset Folders/Collections
- Utilizing the Favourite Group
For an in-depth, step-by-step walkthrough of managing presets in Lightroom Traditional, take a look at this earlier publish on the best way to manage Lightroom presets.
Use the Favorite Lightroom Presets Performance
The following step is so as to add presets you wish to use in Lightroom Cellular to your Favourite Group so you’ll be able to entry them extra simply.
Whenever you transfer a preset to Favorites, it will likely be positioned proper on the prime of the Preset Panel, so that you don’t must search for it all through all of your Library.
So as to add a preset to Favourite Group:
- Within the Develop Module, right-click on the preset you wish to add
- Click on “Add to Favorites”

It’s simply as simple to eliminate a preset. To take away a preset out of your Favourite Group:
- Within the Develop Module, right-click on the preset you wish to take away
- Click on “Take away from Favorites”

Export Presets from Lightroom
Exporting your Favourite Group from Lightroom is a crucial center step towards transferring it to your cellular app. You may’t transfer your preset on to Lightroom Cellular.
On this step, you’ll export your Favourite Group from Lightroom Traditional right into a zipped file in your desktop pc (or wherever else you need).
Steps to export Lightroom Favourite Group:
- Within the Develop Module, go to the reset Panel and right-click on “Favorites.”
- Go to “Export Group”
- An “Export Preset” dialogue field will pop up.
- Within the “Save as” part, give the gathering a reputation
- Subsequent to the “The place” part, choose the placement the place you wish to obtain your favourite presets
- Click on on “Save“

For an in-depth, step-by-step walkthrough of exporting presets in Lightroom Traditional, take a look at this earlier publish on the best way to export Lightroom presets.
Import Presets to Lightroom Desktop
The very last thing it’s a must to do is import the zipped presets to Lightroom Desktop (former Lightroom CC) – that is one of the simplest ways to sync your presets with Lightroom Cellular and simply entry them.
You may choose just some presets for Lightroom Cellular – particularly, those you employ probably the most. I believe a “candy spot” can be between 5-15 presets.
The right way to import presets to Lightroom Desktop:
- Open Lightroom Desktop
- From the menu bar, select “File” and click on on “Import Profiles & Presets.”
- Within the “Import” dialog field, browse and choose the preset you wish to import.
- Click on “Import.”

Your presets at the moment are synchronized with Lightroom Cellular – you’ll be capable of see them within the “Presets” Panel within the app.
The right way to Create a Preset in Lightroom Cellular
Now all of the steps to successfully handle a sizeable preset library on all Lightroom platforms.
Alternatively, you’ll be able to create presets instantly in Lightroom Cellular. That means, you’ll be able to see how the preset develops in your cellular display.
Steps to create a preset in Lightroom Cellular:
1. Open or import photograph in Lightroom Cellular
- Go to your Lightroom Cellular app and click on on it.
- Within the Library Module, faucet the three dots subsequent to “All Pictures.”
- Choose “Add Pictures” from the dropdown menu
- Select so as to add pictures from “Gadget” or “Information.”
- You may kind your search within the higher menu by “Time” or “Gadget Folders.”
- Faucet the photograph of your selecting
- Faucet “Add“
Click on “All pictures” to see your imported photograph and edit it.
2. Make Changes to Your Picture
Edit the photograph the identical why you do it in Lightroom Traditional. The changes can embody altering publicity, shade, white steadiness, or vibrancy, adjusting shadows, highlights, and distinction – edit till you’re glad with the consequence. You may see most of them within the backside toolbar (with names like Mild, Shade, Results, and so on.)
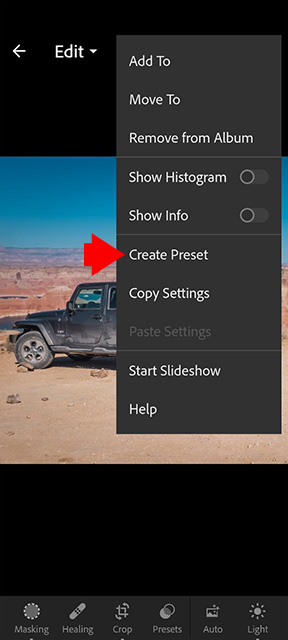
3. Creating Preset in Lightroom Cellular
- Click on on the three dots within the higher proper nook of your cellular display

- Choose “Create Preset“
- Within the “New Preset” dialog field, go to “Preset Title” and provides a reputation to your preset
- Go to “Preset Group” and choose an present group or create a brand new one (by choosing “New Preset Group“)
- “Choose” – you’ll be able to choose and select which changes you wish to maintain; test or uncheck in response to desire.
- Save preset by clicking on the checkmark within the prime proper nook of your display

The right way to use preset in Lightroom Cellular
That is the final step of the entire course of. Upon getting created or imported the preset, you’ll be able to reuse it on another photograph by taking these steps:
- Open a picture in Lightroom Cellular
- Scroll the toolbar on the backside of the display, and choose “Presets.”

- Search for the Group (Consumer Presets in my case) you save your preset in

- Click on on the preset
- Press the checkmark button within the prime proper nook

- Apply any further changes – if crucial
The right way to Save Preset in Lightroom Cellular | Ultimate ideas
Creating predictable and repeatable modifying workflows is what separates professionals from amateurs. On this article, we’ve thrown down the gauntlet to debate one side of workflow: presets.
It’s quite simple to extract your favourite presets from Lightroom Traditional, import them into Lightroom Desktop and synchronize them with Lightroom Cellular.
And now that you simply bought group out of the way in which get pleasure from your self and take some pictures!